⏱️ Trial Mode
Keymatic offers a 10-minute trial per session. After the trial expires, features are disabled until you activate a license.
⚠️ Trial Limitations:
• 10 minutes per session
• All features available during trial
• Features lock after trial expires
🔑 License Activation
After purchase, you’ll receive an activation code by email. Then apply it inside Keymatic using the app logo menu.
How to activate
-
Buy a license
Complete checkout using your email.⚠️ IMPORTANT: Use the SAME emailThe activation code is sent to the email used at checkout. -
Check your inbox
You will receive an email containing your activation code.Tip:Check spam/junk if you don’t see it within a few minutes. -
Apply the code in the app
Open Keymatic, then right-click the app logo (⚡) and choose “Activate / Apply Code”. -
Paste your code and confirm
Paste the activation code exactly as received, then confirm to unlock.✓ Activation complete!Your Keymatic is now fully unlocked.
Troubleshooting
- Didn’t receive the email: check spam/junk and verify the checkout email.
- Code rejected: paste again (no extra spaces) and confirm you’re using the same email.
- Still stuck: contact support at suportlm001@gmail.com.
✨ Features
- Background key sending — works even when minimized
- Multi-window — one button can control multiple windows
- Loops & repeats — automate repetitive tasks
- Configurable delays — fine-grained timing control
- Global hotkeys — start/stop from anywhere
- Minimal UI — stays discreet on the screen
📥 Installation
- Download and install Keymatic (see Download)
- Run Keymatic.exe
- Use Trial Mode or activate a license
Folder structure
📁 Keymatic/
├── Keymatic.exe
├── PMX.dll
├── ICSharpCode.AvalonEdit.dll
└── ICSharpCode.AvalonEdit.xml
🖥️ UI
Keymatic uses a right-side panel with quick actions.

| Element | Description |
|---|---|
| Logo (⚡) | Right-click for menu (About, Activate / Apply Code) |
| ➕ Add | Create a new macro button |
| Macro Buttons | Run/stop + drag to capture a window |
| − Minimize | Minimize to system tray |
| ✕ Close | Exit the application |
🚀 Getting Started
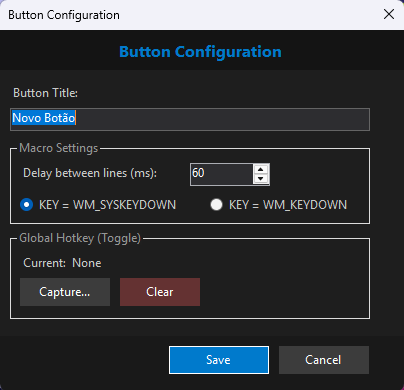
1) Create a button
Click ➕ and configure:
- Title (~8 visible characters max)
- Line delay (ms)
- Hotkey (optional global shortcut)
2) Capture a window
Drag the button onto the target window and release.
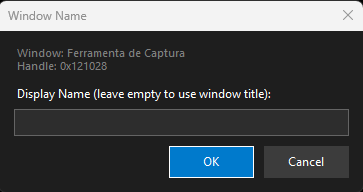
Tip:
You can capture multiple windows in the same button.
☕ Support the Project
Keymatic is developed and maintained by an independent developer. Your support helps keep the project alive.
☕ Buy me a coffee